I hope you enjoy reading this blog post.
If you want my team help you Get More Traffic More Customers More Revenue With Digital Marketing, just book a call
X
If you want my team help you Get More Traffic More Customers More Revenue With Digital Marketing, just book a call
Last updated on 5 December, 2023 by Ravi Gupta
Summary: So, you’re looking for how to start a blog. This guide will surely help you out. The tutorial below lists the exact steps for starting a blogging journey from scratch.
Creating a blog and staying active daily is the best way to hone your writing skills. In professional life, it is a powerful source to highlight your brand value on the big picture and make people aware of your presence and skills in a particular work.
But make sure you stick to one niche to better clarify your vision and objectives to the targeted audience. Before you start, be serious about your domain name, Hosting, and theme because these three things will remain unchanged. Without wasting a moment, let’s jump in.
In this digital age, over 77% of all internet users read blogs. Worldwide, over 600 million blogs are actively sharing value in their viewers’ lives, as confirmed by WebTrends in its recent survey of 2022.
The category has grown insanely competitive in recent years. Still, the room for opportunity is bigger than your expectations.
In a survey by Orbit Media, over 80% of bloggers responded that blogging drives the results and can also drive success for you.
Have a solid base from the start, and see how your Blog converts into a money-making machine for you in no time.
But before starting a blog, it’s necessary for your education that you understand the big difference between a blog and a website, which needs to be clarified.
Websites and Blog – both terms have similar functionality, similar building process, and almost a similar online presence. But the thing that differentiates a blog from a general website is the intent or goal of the website or blog operator.
In the mainstream, blogs are information-sharing websites whose main objective is to serve value. At the same time, websites could be an e-commerce platform, a business portfolio, or web software whose main objective is to bring in sales and conversions.
Blog websites are usually built with multiple pages, posts, and categories and may have tons of information in a readable and viewable form.
But websites may have limited pages, posts, tags, and categories, with no detailed information except for some information about a particular value proposition or the fulfillment of a particular objective.
Still, both are correlated.
The main purpose of blogging is to serve value to customers and be able to answer their particular queries online. Similarly, if blogs are shared on individual websites, they will rank faster on the search engine.
But it is worth noticing that only successful online websites deliver value before products/services to customers, and blogs are the ultimate source for companies to do that.
As confirmed by Parse.ly, over 76% of content marketers use content or blogs to generate leads.
However, not every Blog will be successful in the end. You must follow some basic rules before launching your first Blog on the Internet so that you can progress at the same time.
Before you start a blog, you should find a niche in which you can succeed. You can ignore this point if you hire a dedicated team of writers and content creators for the niche.
But even in the future, if you want to be the HERO of your Blog, and would like to take the entire Credit of your Blog, consider choosing a niche, you are an expert in or a niche you are passionate about working in. And why does it matter? Given below are some of the best reasons:
If you have learned the value of a blog niche but still can’t figure out the best niche you want to work in, here’s how experts find their blog niche:
Interest-based niches are always the best option. There will be a time when you become demotivated about your niche and your Blog. You will be less interested in writing on the topic. But if your Blog is built around a niche in which you are an expert, it will keep you motivated about writing. Success in blogging is heavily influenced by passion. If you are passionate about your blog topics, results will be instant. For example, you can be passionate about making artificial flowers, cooking, or colored pencil drawings.
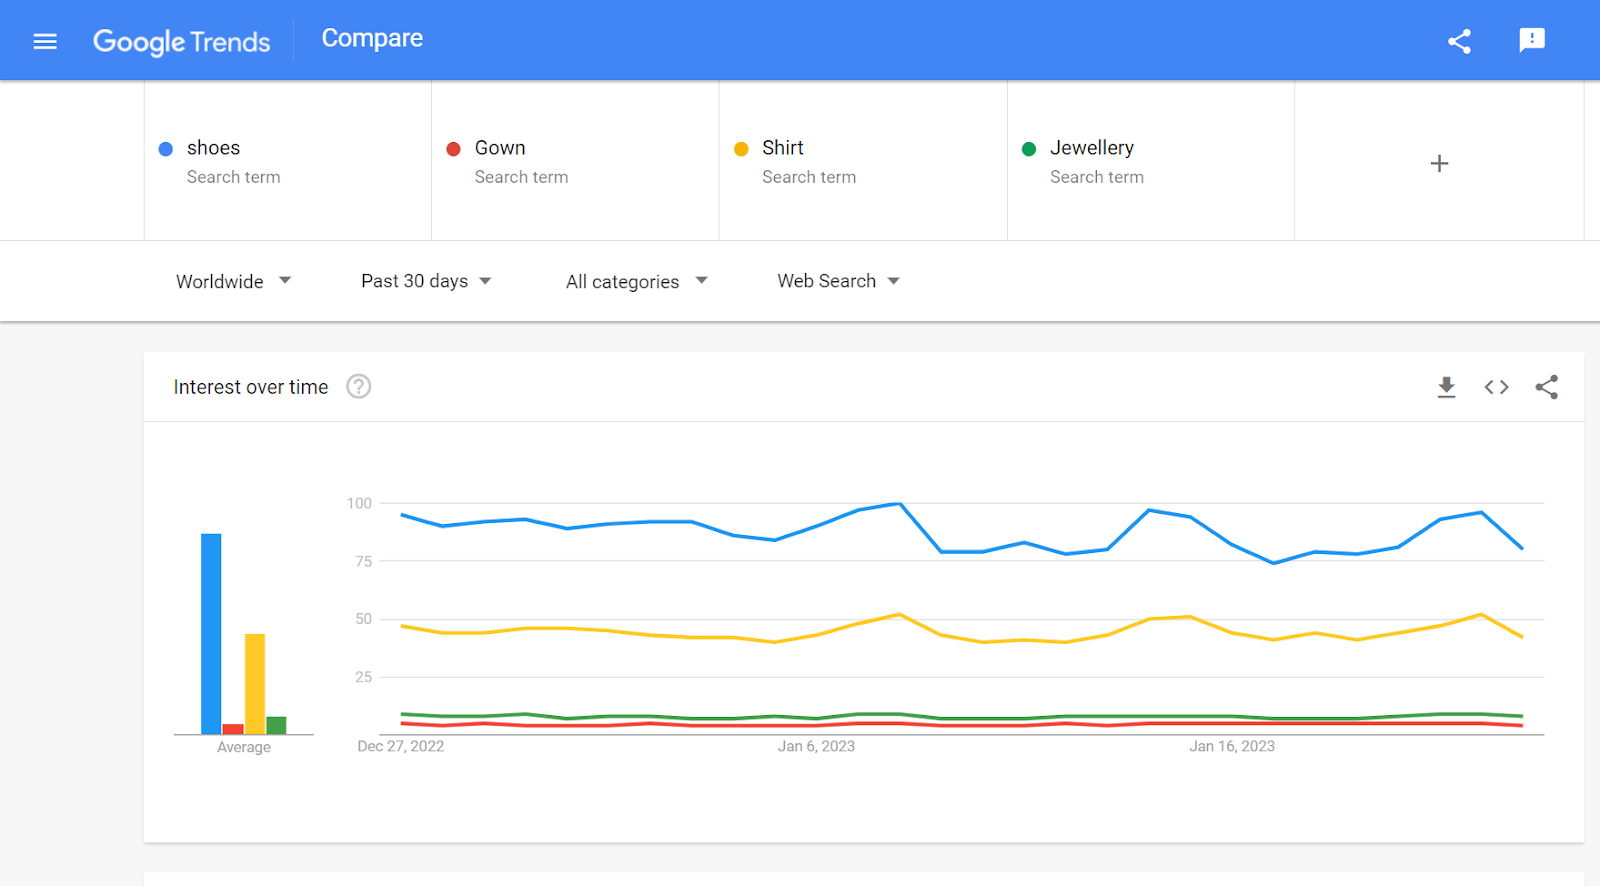
Some niches on the Internet are extremely popular. If you can’t find your passion and a relevant niche, the next best option is to take references from the Internet. Here we use Google Trends to determine the search volume of particular keywords (or niches) on the web.
As you can see, the Shoe category (in blue) has the most searches, the Gown niche (in red) has the least searches, and the Jewellery and Shirt niches have an average monthly search volume.
Similarly, you can even evaluate your own interest-based niche. Have any four or five interest-based terms in mind, put them into Google Trends, and whichever has more search volume, build your Blog around it.
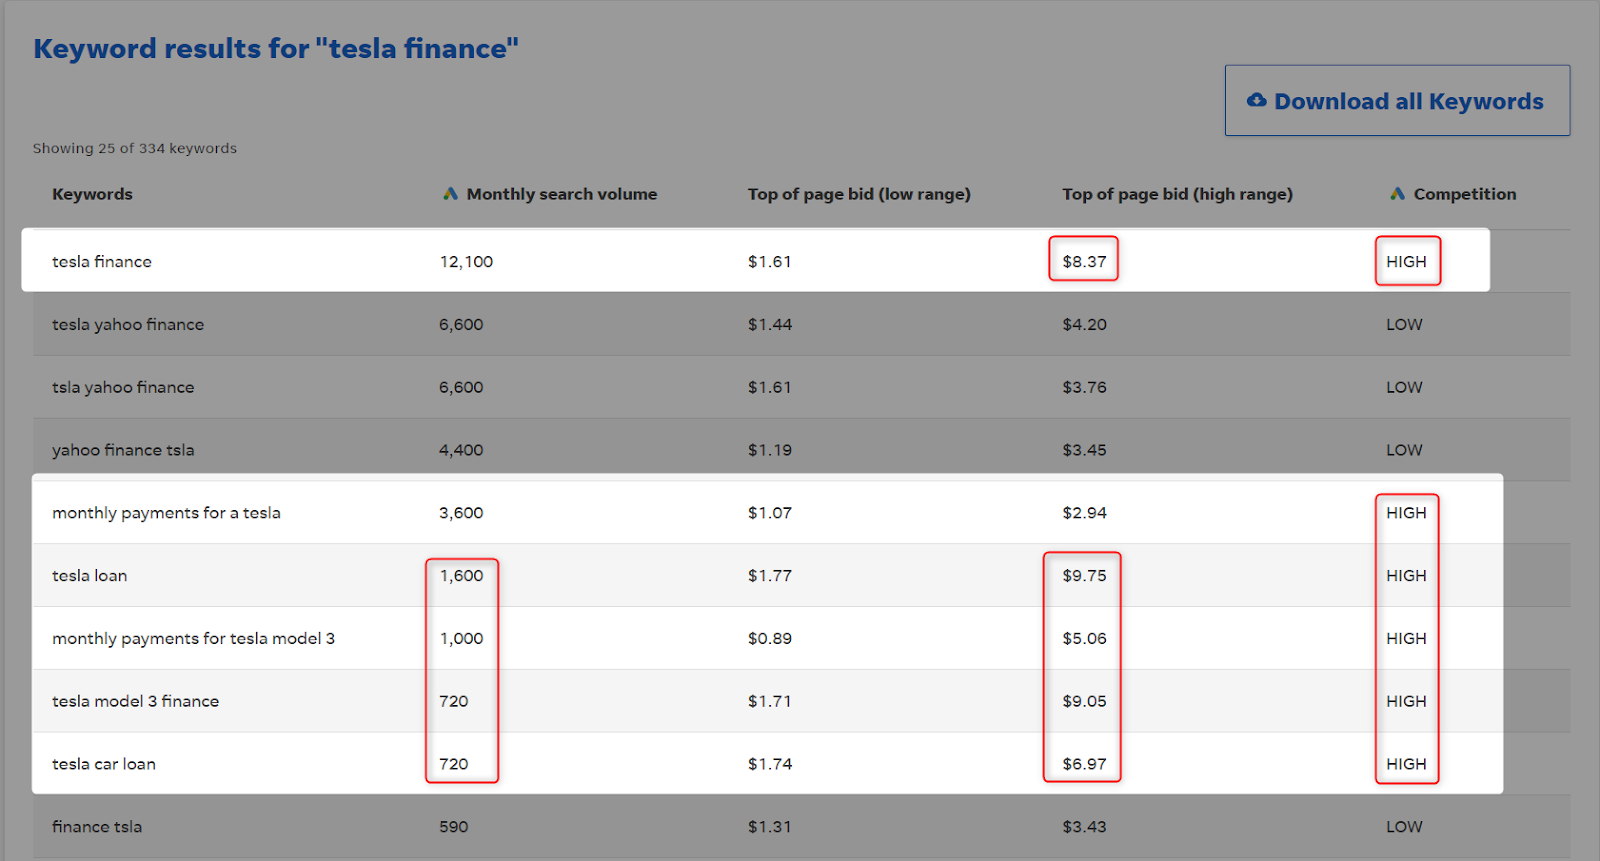
If your Blog’s niche is neither interest-based nor influenced by search volume on the Internet, then it will probably be decided by the cost-per-click (CPC) term. The term describes how much revenue a blog will generate from a single user click. Building blogs around a niche with a high CPC can help you make more from the Internet. However, it has a drawback, too, because some niches high in CPC are competitive. Similarly, some niches with a high CPC might have no search volume.
As you can see, the monthly search volume for a niche around “Tesla Finance” is relatively low. But the cost per click offered here is between $6 and $9, which is fairly impressive. Since the level of competition is also high, you will have to put in extra effort to attract traffic to your website.
The Internet is an explosion of information, data, facts, and knowledge, but there are certain niches nobody is working in. You may be an expert on something interesting that people have been looking for on the Internet for a long time but couldn’t find. It can be a query that you once asked Google or something else. This is where your Blog’s extensive capabilities truly shine through.
(Note: if you are making a money-making blog, it should attract voluminous traffic and be valued by advertisers as well. Make sure none of your Blog violates Google policy, as it may force the search engine to take down your website.)
The domain is the identity of your blog website. In the future, if your Blog emerges as a BRAND, your Blog is more likely to be searched by your domain. For example – searches happen like this “top 10 richest person in the world by Forbes.”
So, make sure you have chosen a domain that’s easy to read and get remembered by people easily. After identifying your niche is the most important step because your domain will be unchanged after this.
You will build your entire online business on this, so select appropriately.
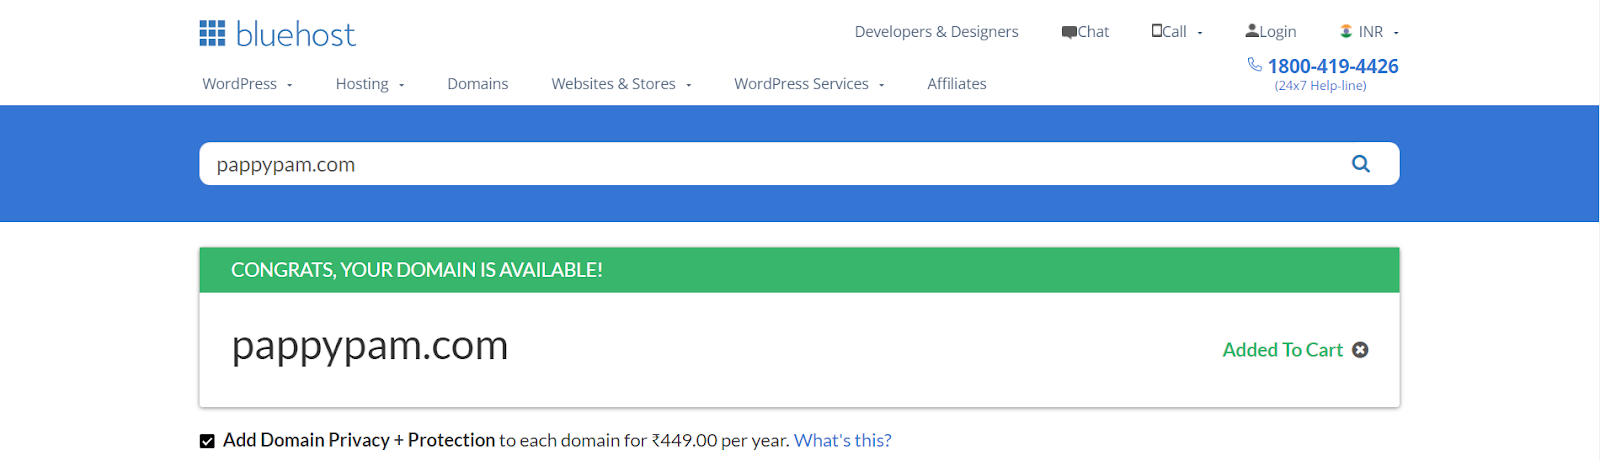
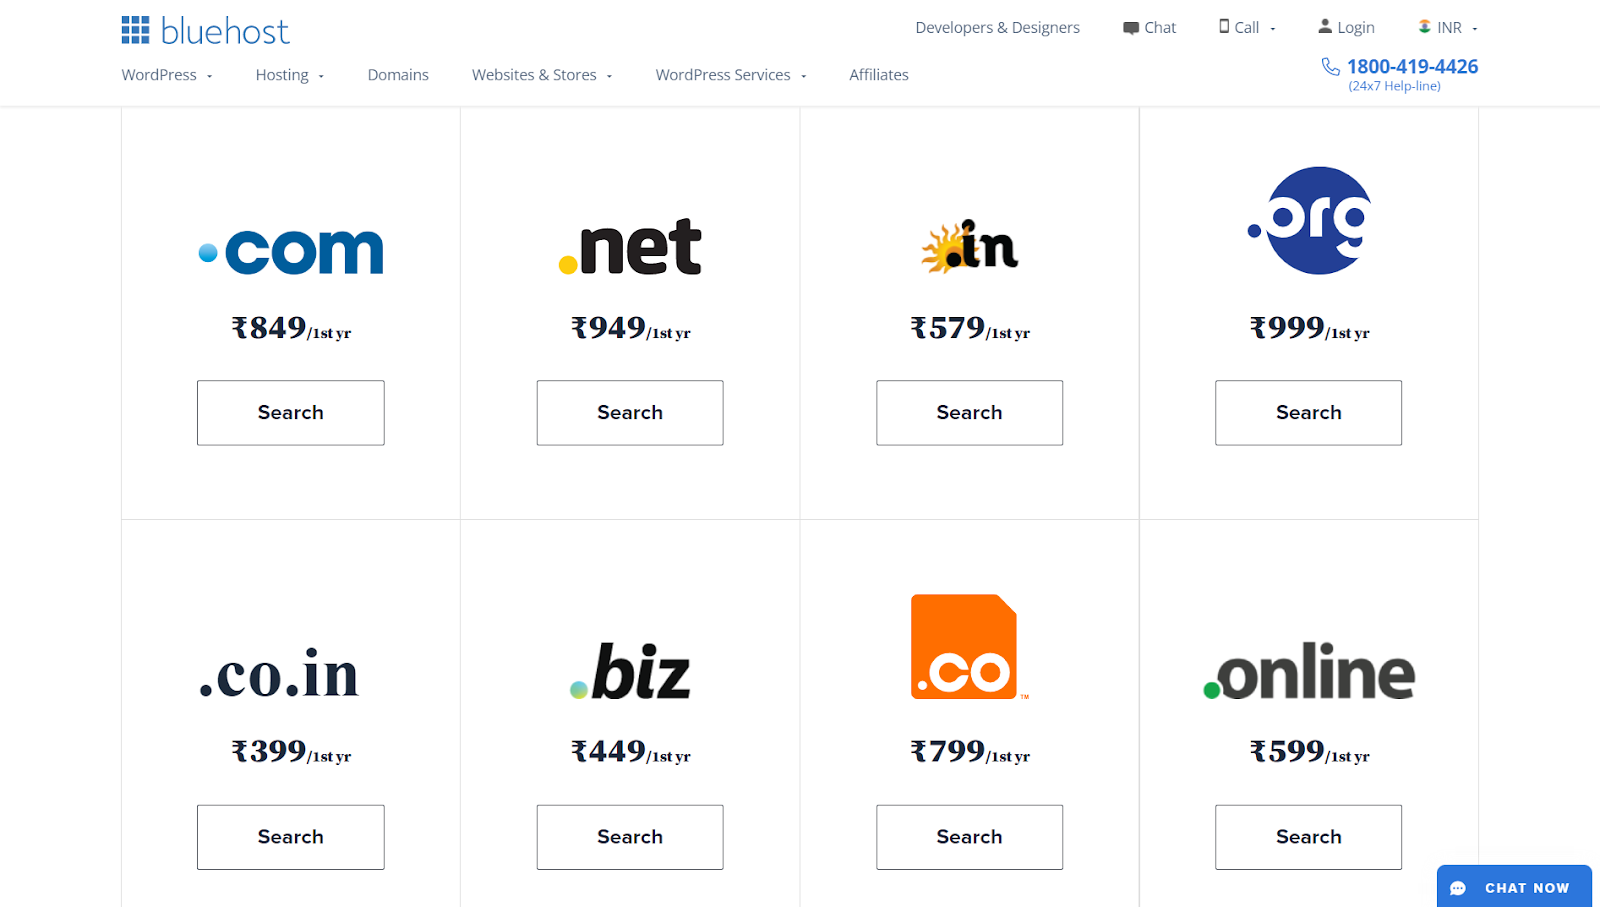
As you can see in the visual above, we have booked a domain that’s short and easy to remember. While choosing a domain name, you are given options to choose any one from .com, .net, .org, .app, and .in.
The .com domain will be highly recommended if you start a blog. But if you are targeting a specific country and about to share information in a regional language, you can choose .in (India) or .uk (UK) and similarly other domain.
However, .com domains are globally used, so better to choose “yourdomain.com” only.
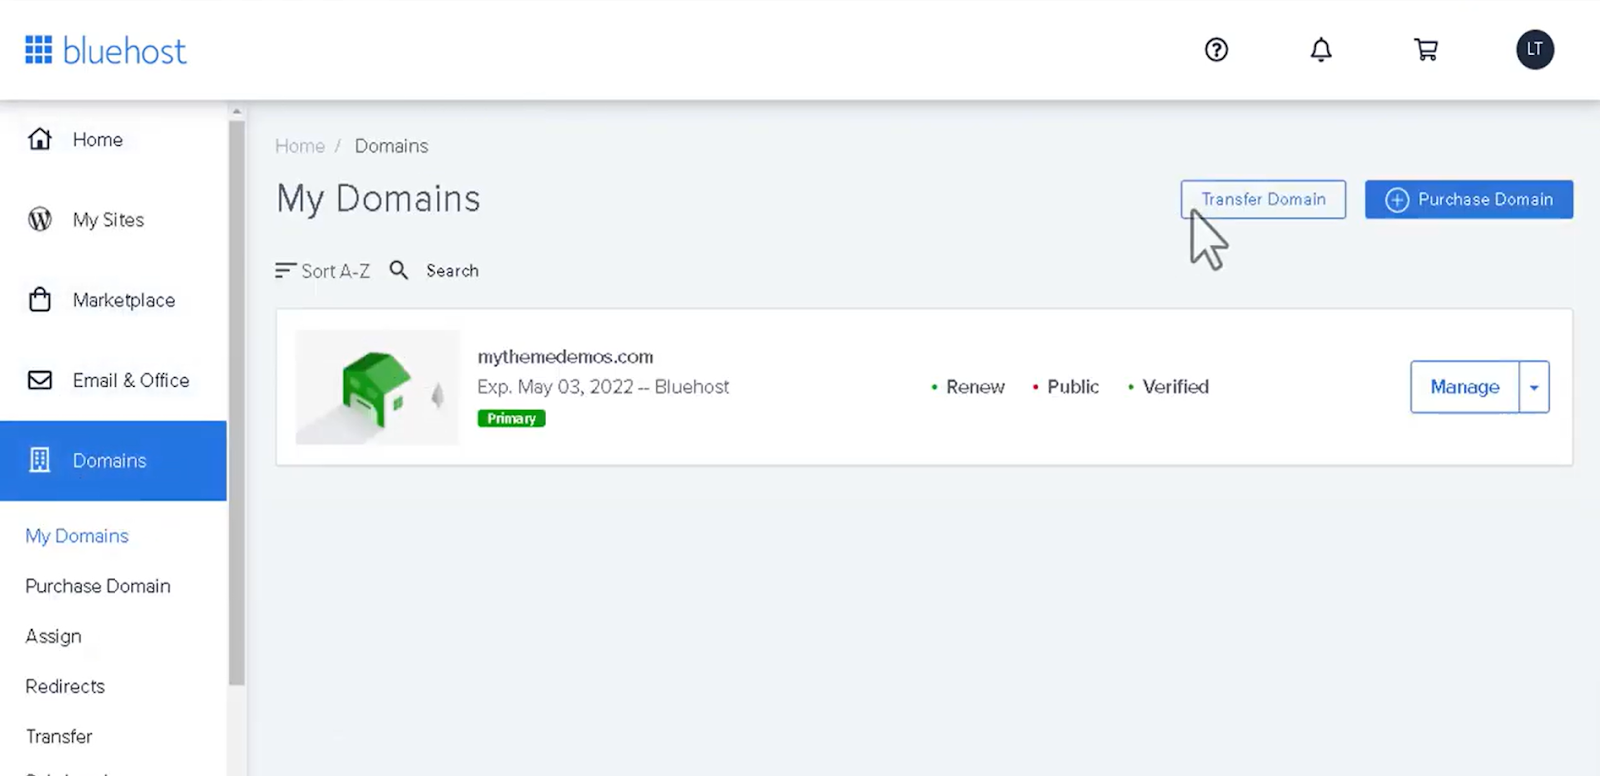
Alternatively, you can even transfer your existing domain to any publicly traded Internet domain registrar if you are satisfied with their services. Simply go to the “transfer” option, and place your domain as shown in the visuals below.
The process may take some time because you will initiate a change of registrant by contacting your current registrar. Subsequently, you will configure domain settings with your upcoming domain registrar or domain broker. Upon confirming via email, domain transfer will be initiated.
Charges for domain registration vary significantly from one registrar to another. But make sure you purchase from a trusted party only. If you are purchasing an old domain, evaluate its history first. The billing cycle for the domain can be selected on one year, two-year, or five-year basis.
You have shopped your domain. But it is still invisible from the search engine. Nobody can see it except you. You can manually put “yourdomain.com” into the search box, and you will notice that except for the URL, the website will have nothing to show.
It is because your domain registrar only helps you in getting a place on the digital landscape. Your website’s appearance and building blocks are laid by the Hosting Provider further.
Simply put, Hosting provides stable storage for your website files. It is a place where your website data will be stored in a secure and fully encrypted ecosystem.
With good web hosting, your blogs also build the ability to rank top of the search results through an optimized server.
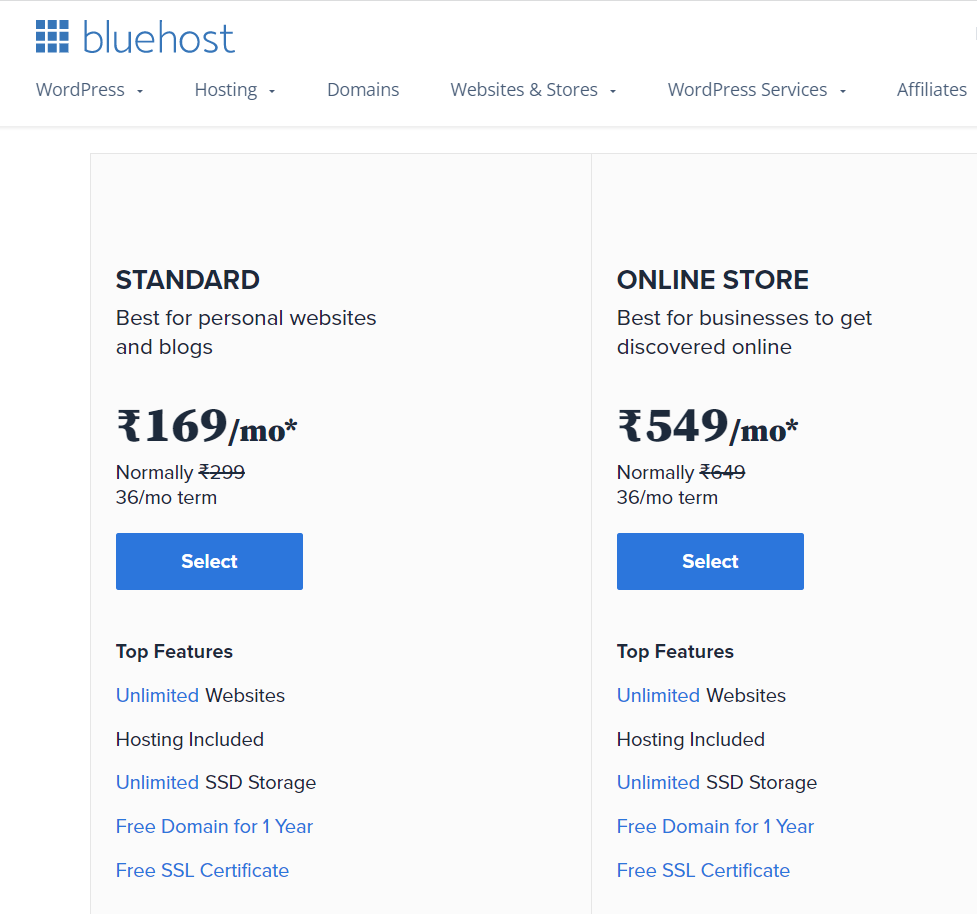
As you can see in the visual above, we are purchasing hosting plans by Bluehost specifically designed for personal blogs and websites. But here, the Hosting service provider can be seen providing two plans.
The “Standard” plan is designed for small or personal blog websites. Similarly, an “Online Store” is designed for enterprises that are working in a team.
If you are just starting out, Bluehost’s “standard” Hosting plan will work for you. You can run just one site on this Hosting seamlessly without any issues.
In both plans, you obtain a Free SSL certificate (that keeps your Blog protected) and a free domain (for 1 year).
If you have purchased “Hosting” and “Domain” separately, you will have to create a link between both to get your website featured online.
The step takes you through a learning curve. You need to copy the “nameservers” from your Hosting dashboard. As you can see in the visuals, you’ll find it in the “Account” and then the “Details” sections.
These name servers commonly look this –
ns1.bluehost.com
ns2.bluehost.com
You may have a unique name server, so copy them from the respective field. It is the only way to point out a domain to Hosting Provider, so follow the step carefully if you want your blog journey smooth-going.
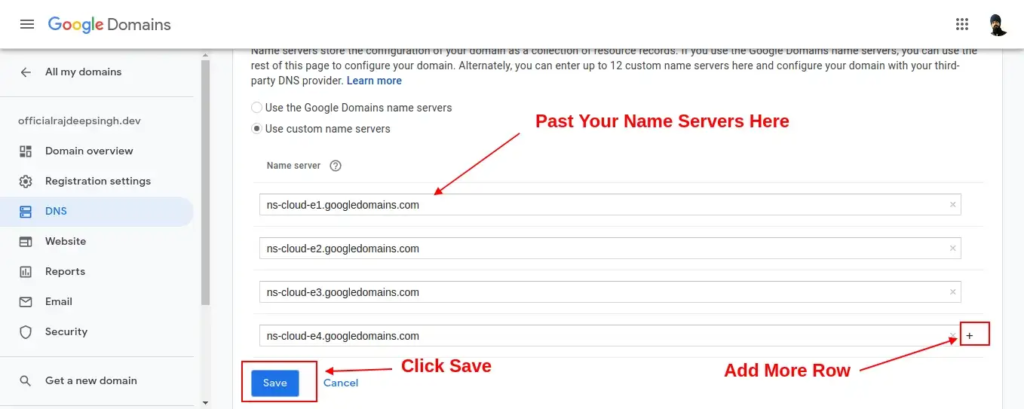
After copying the “nameserver” from your Hosting Provider, go to the domain registrar and login to your dashboard. After logging in, on your dashboard, go to the “DNS” section and scroll down to find “Nameserver.”
In this section, you will be pasting your copied name servers individually. The section may already have a domain registrar’s name server. You can remove or simply select the “+” icon to add more rows where name servers could be placed down.
After successful placement, hit the “Save” button and wait for the confirmation in the email. Usually, it takes 24 hours to get the whole process done.
Once the step is accomplished, you can install WordPress (A popular Content Management System). It makes your blogging journey a breeze. However you can also use other alternatives, but if you don’t want to run into any confusion, we recommend WordPress.
You can install WordPress using these few basic steps.
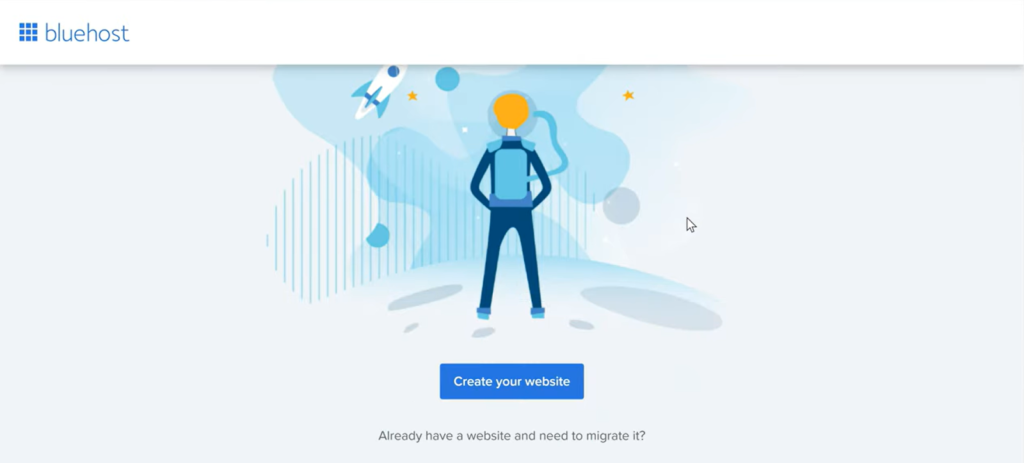
1. After successfully purchasing your Hosting plan at Bluehost and linking your domain, you’ll receive a confirmation from the Hosting Provider when your site is ready to launch.
2. As soon as you receive it, Log-in to your Bluehost dashboard and click on the “Create Your Website” option.
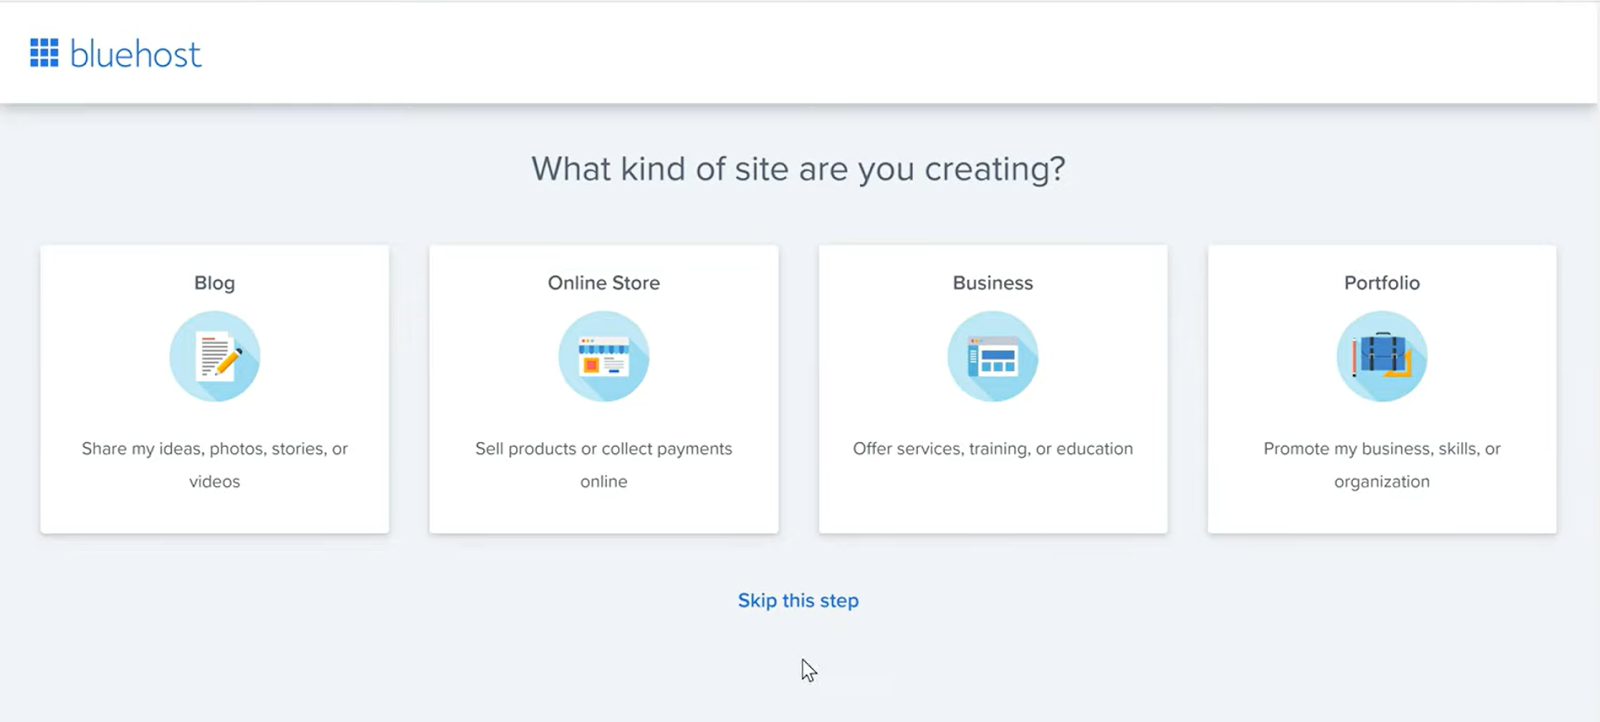
3. On the interface, you’ll see options asking whether you want a Blog, an Online Store, a Business or a Portfolio. Since we are creating a blog, we can select the “Blog” option or simply skip the step.
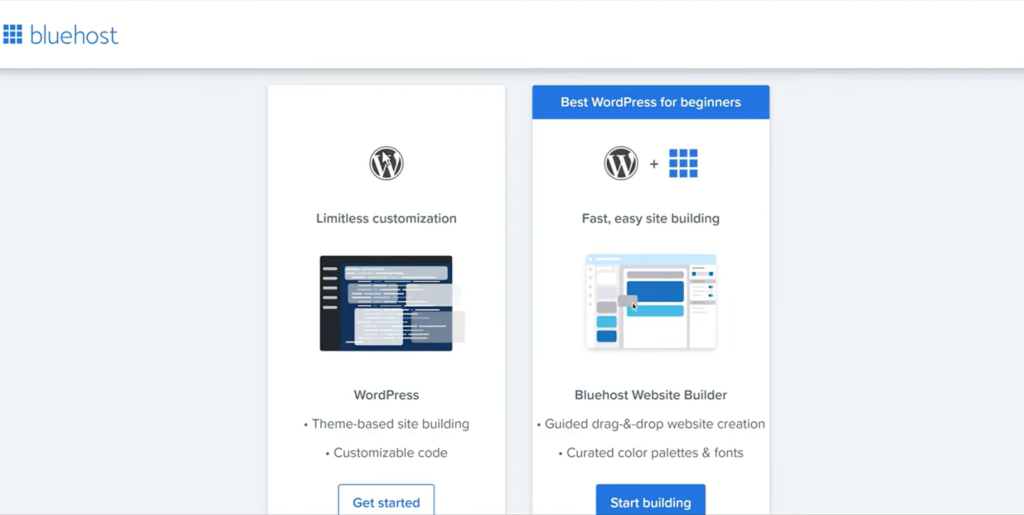
4. As given in the visual, you will be given two options “WordPress” and “Wordpres+Bluehost” website builder.” Choose any best alternative from the two.
5. Hereafter, you will be given the option to decide your “administrative username” and then “administrative password.”
6. You can even give a special website title to your website (which could be your brand’s tagline). On the next page, you will see your websites connected with the hosting service provider.
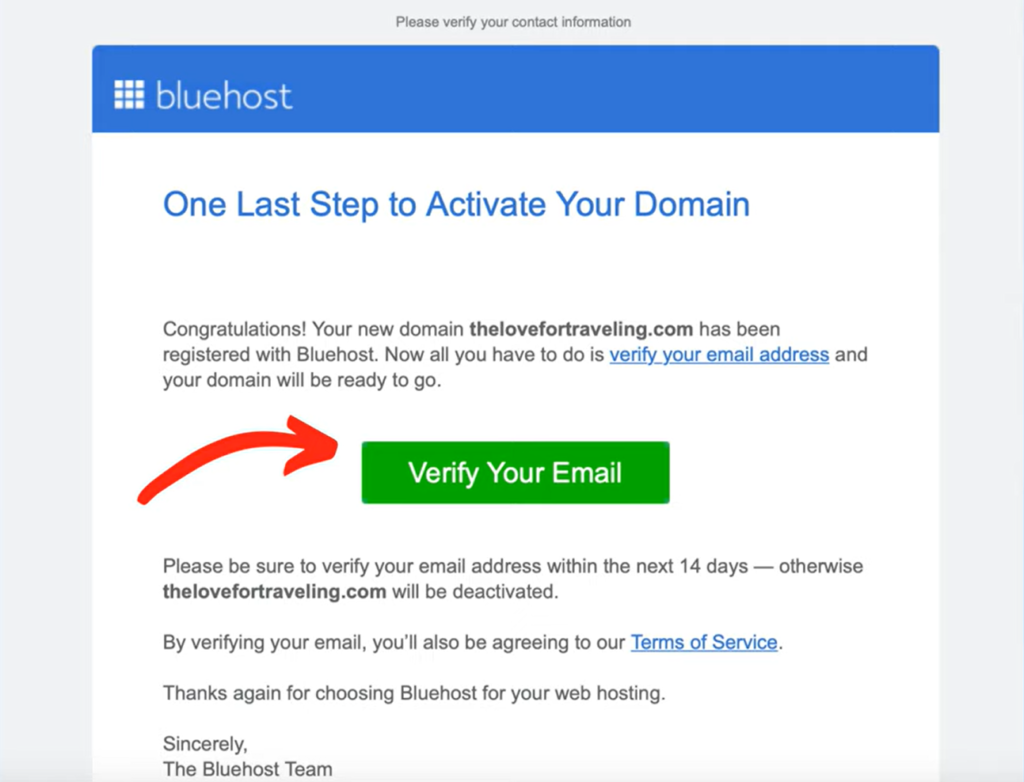
7. Before you install WordPress, a confirmation email will be sent to your registered Email ID. Get it and verify your registered Email ID.
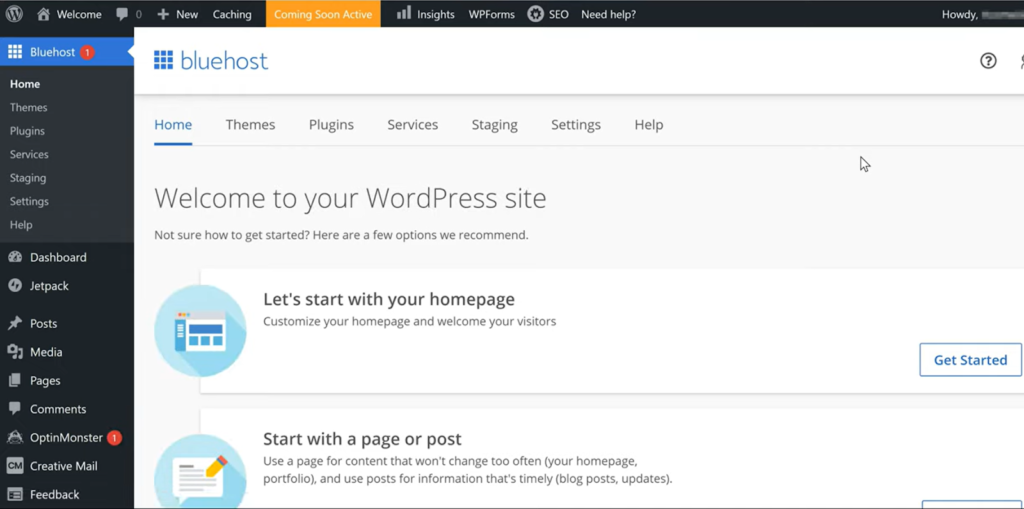
8. Upon confirmation, you will be redirected to the WP dashboard, from where you will commence your blogging journey.
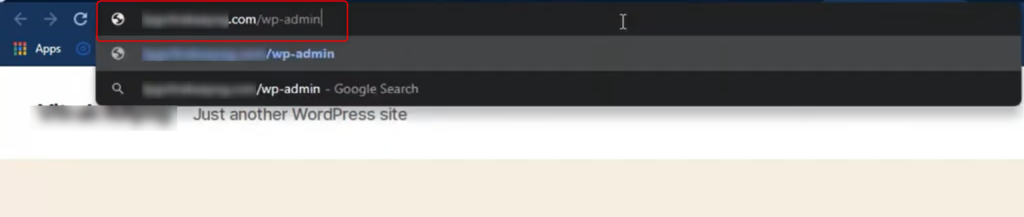
9. You do not need to access your website directly from the Hosting Provider. Instead, you will manually create a link with your domain.
As shown in the visual above, right behind your “yourdomain.com”, place “wp-admin” This will give you a log-in box that will look something like this.
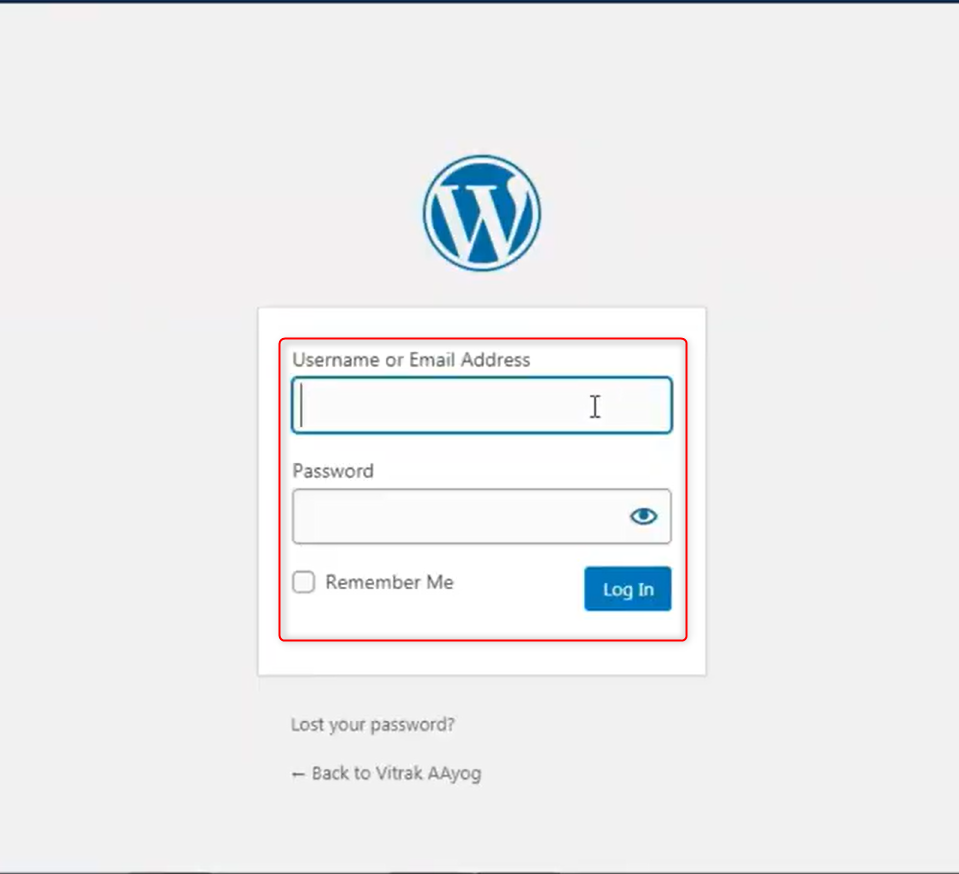
You can use the log-in box to sign in to your website’s dashboard.
Here in the “username” section, you will be using the “administrative username” as created by you earlier while installing WordPress on your site.
In the “Password” section, you will be using a similar “administrative password” as created earlier while installing WordPress.
Your blog website will finally be visible online. WordPress now allows you to customize your site according to your brand or personal-interest-specific needs.
Such as, upon log-in into the WP dashboard, the first thing considered on priority by every new blogger is the blog theme.
The blog theme must be well-aligned with your blog requirements. But before we get deeper into this topic, let’s first understand the basics of how you will get the theme for your Blog.
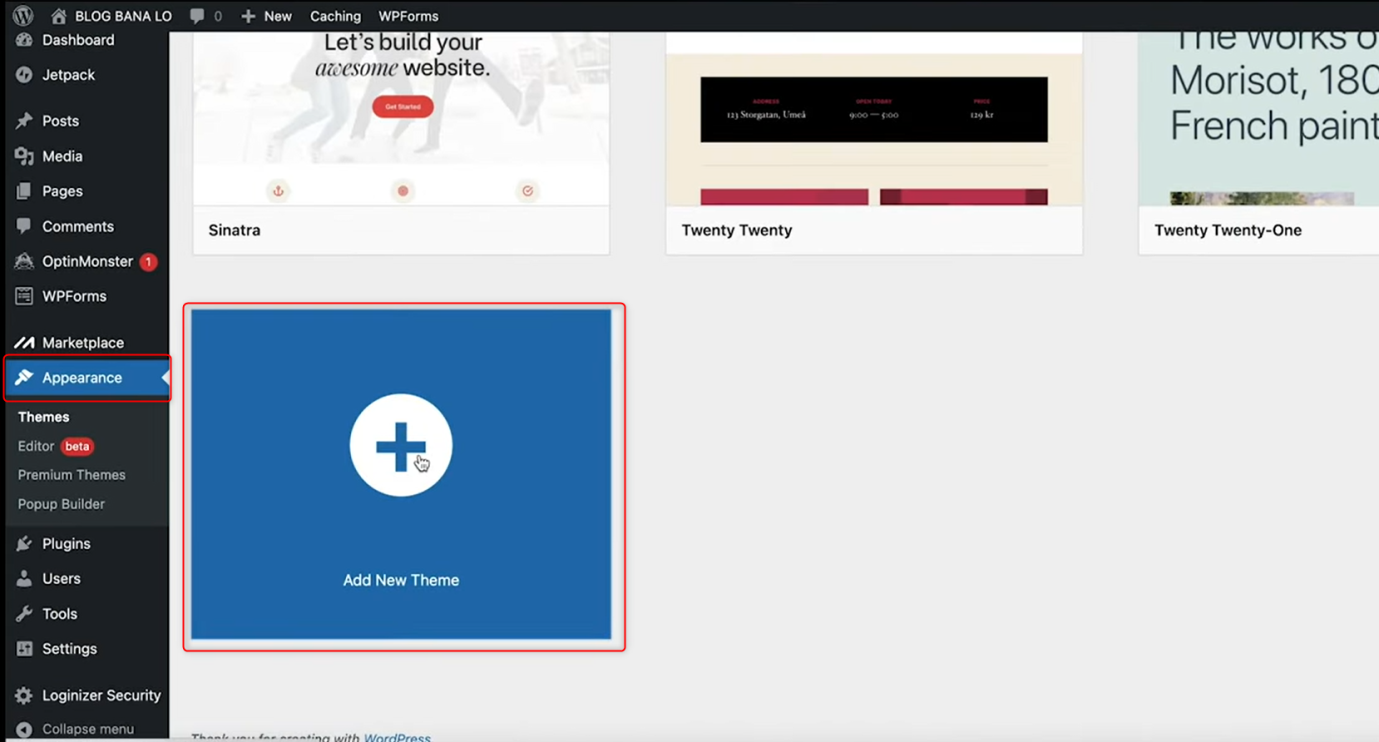
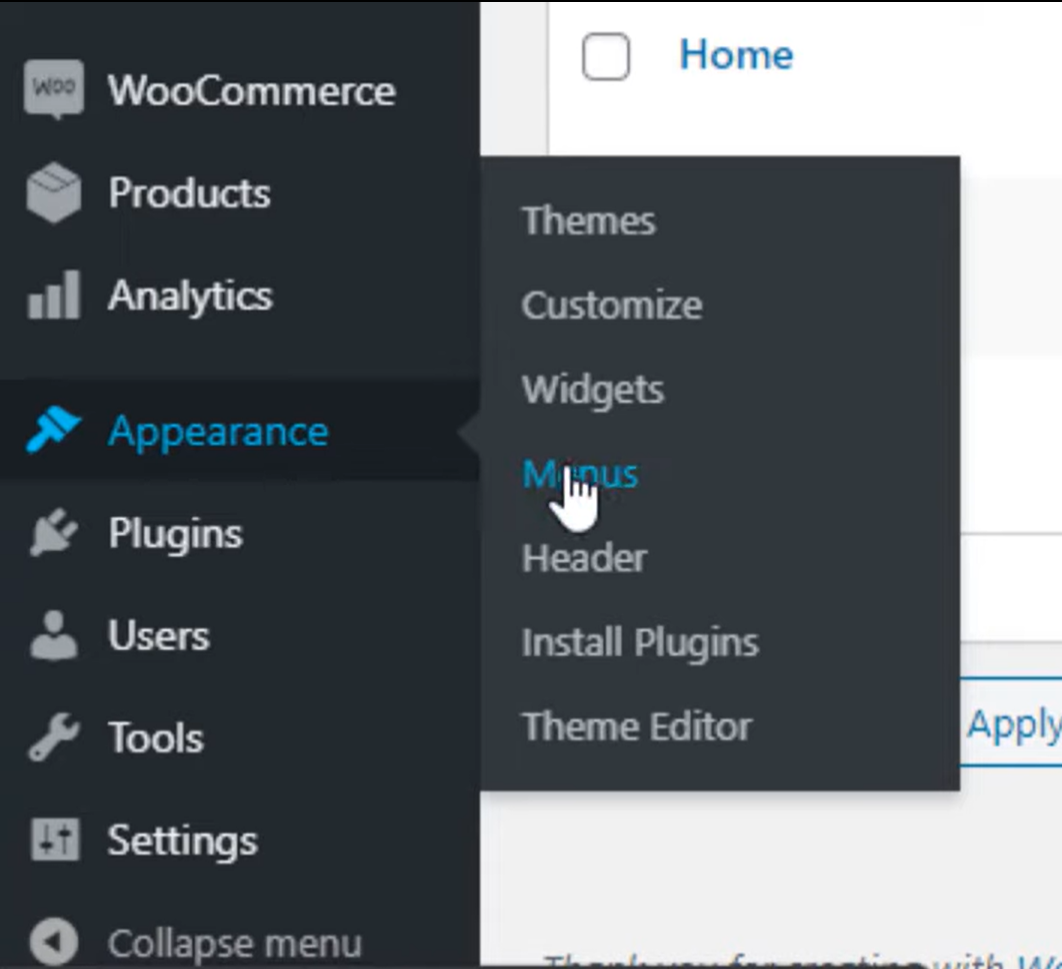
1. As you have successfully logged in to your website, you will see the WP dashboard. Navigate and locate the “Appearance” option.
2. As shown in the visual above, click on “Appearance” and then “Theme.” WordPress already provides you with some featured themes which you can use for your Blog. Alternatively, you can select a new theme by simply clicking on the “Add New Theme” option.
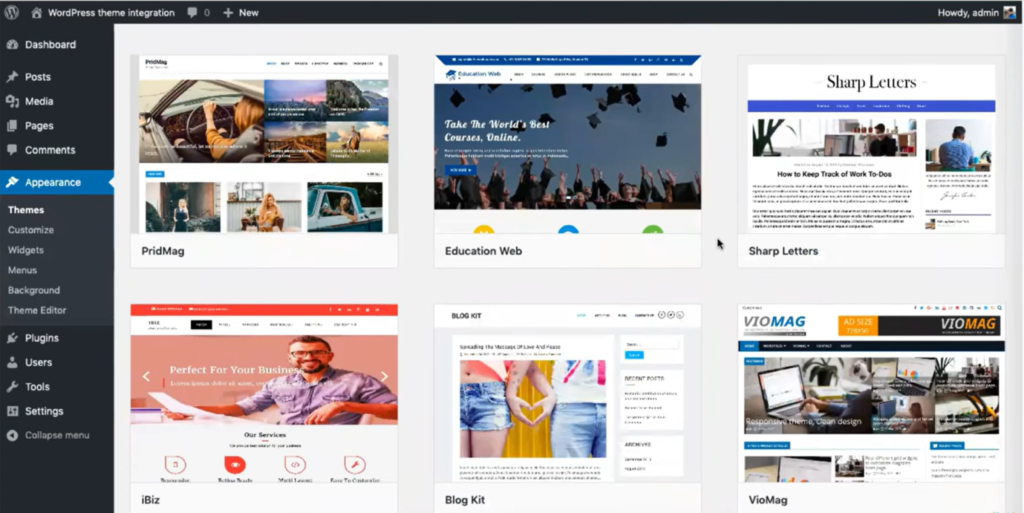
3. Upon clicking the “add new theme” button, you will be given the option to choose between paid, free, popular, to category-wise themes. Luckily you can have a preview of each theme, so review it and make a choice. Hereafter, select the theme that matches your Blog’s requirements and install it.
(Note: you may not get the theme exactly as shown in the preview until you make some adjustments – especially if you have no blog posts, pages, or menu bar created. Some themes even allow you to change the color, layout, and theme of your blog website the way you like.)
Be serious about your journey because from now on, you will be doing some basic set-up for your Blog.
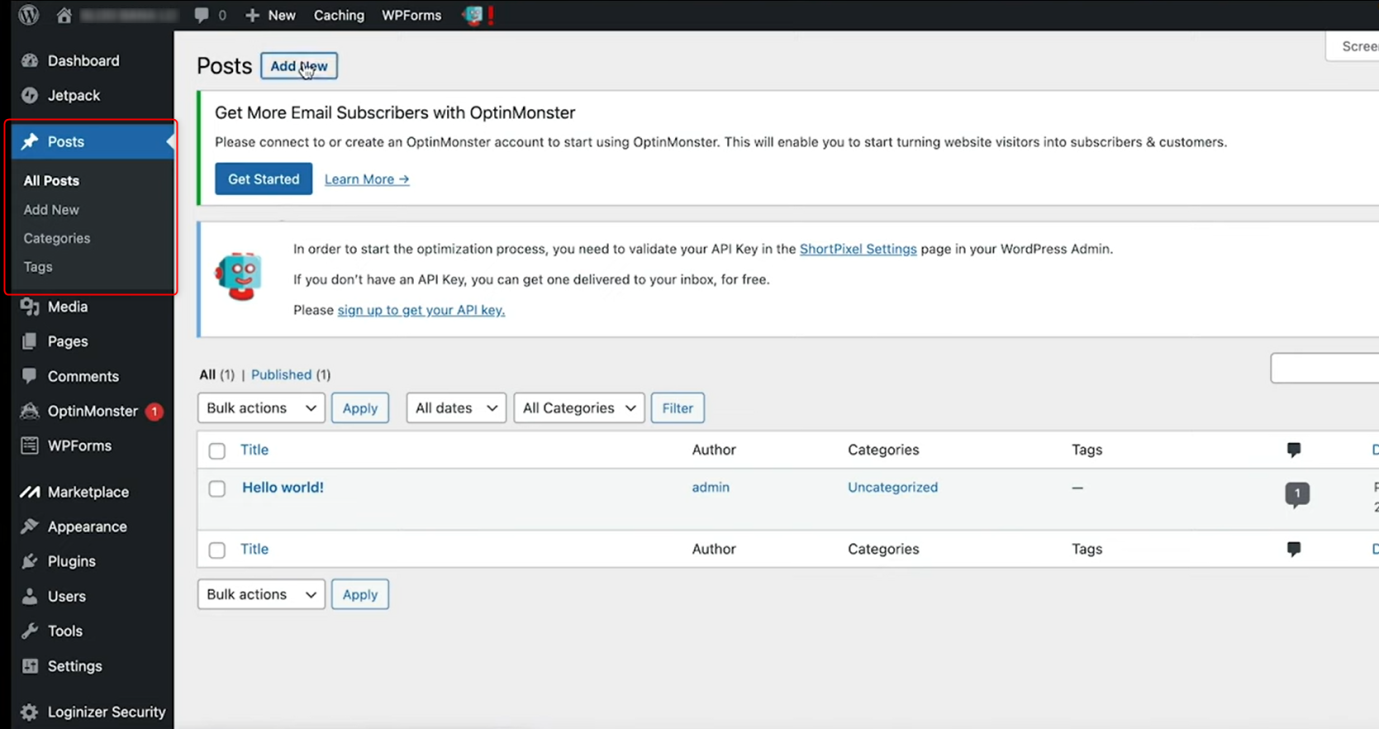
Firstly, you will be starting with your Categories, Pages, and then your first Blog. You will find these options right under the “Post” section in the sub-menu bar.
1. Select the “Category” and create categories that you will be covering in your blog niche. For example –if your Blog is about Insurance, you can create categories in “Car Insurance”, “Bike, Insurance” and “Health Insurance.”
Keeping at least two or three categories is the best way to create a professional-looking blog. However, these categories aren’t accessible on your website. We’ll discuss this topic later. Before, let’s create everything which will appear on your Blog’s navigation.
2. Select “Pages” and create some of the most important pages by using the “Add New” pages button – given in the top section. Your pages must cover the following sections –
Taking reference from other sites, create a privacy policy page and terms & conditions page with utmost care. Similarly, cover your Blog’s main motive and ideas with a brief introduction of what you do and why you do it. Based on these pages, Google determines the overall legitimacy and trustworthiness of your Blog.
You can create a “Contact Us” page using a special WP plugin that can be readily accessible through the WP Plugin section.
3. Posts & Tags can be created at the same time. It is the only section that you will be updated frequently on your site.
Your pages, posts, and categories won’t be visible on your blog site until you have them assorted in a particular menu. Your Menu or navigation bar should be systematically planned and professionally shown on your Blog’s interface.
To create menus, go to the “Appearance” section and select the “Menus” option in the dropdown panel.
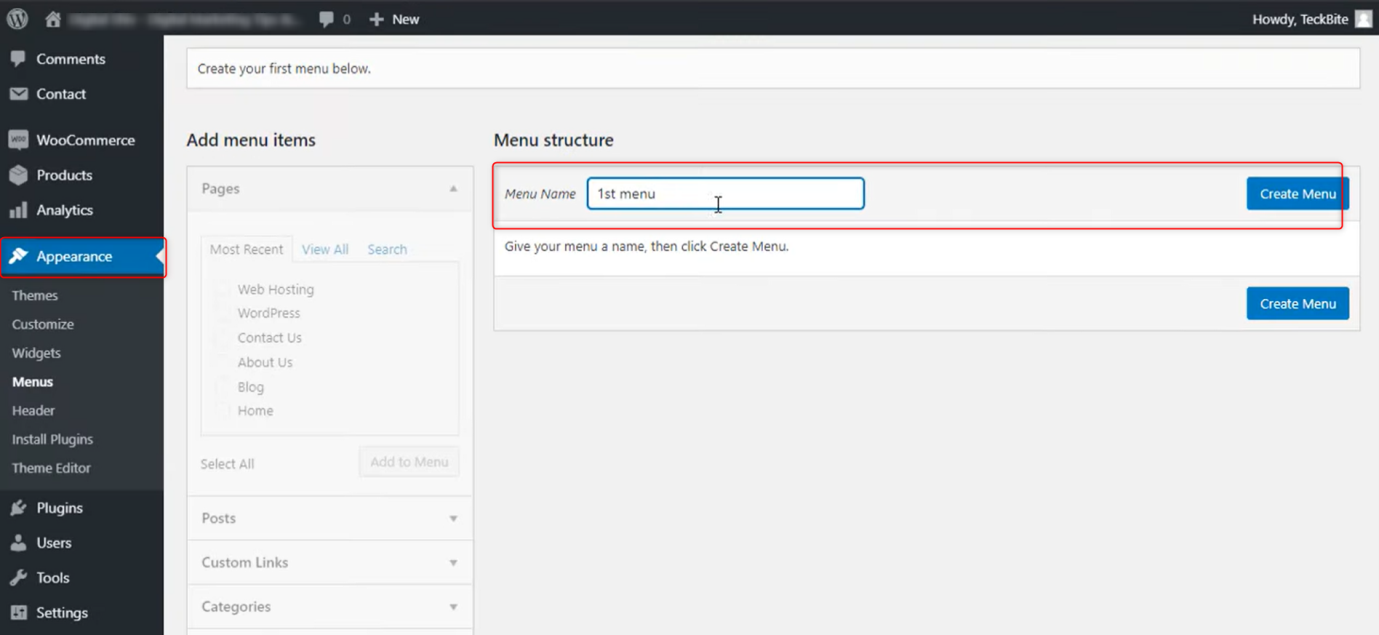
Here WordPress asks you to create a menu and name them so that they are easy to remember.
As given in the visuals above, simply name your Menu first and hit the “create menu” button then to complete the process further.
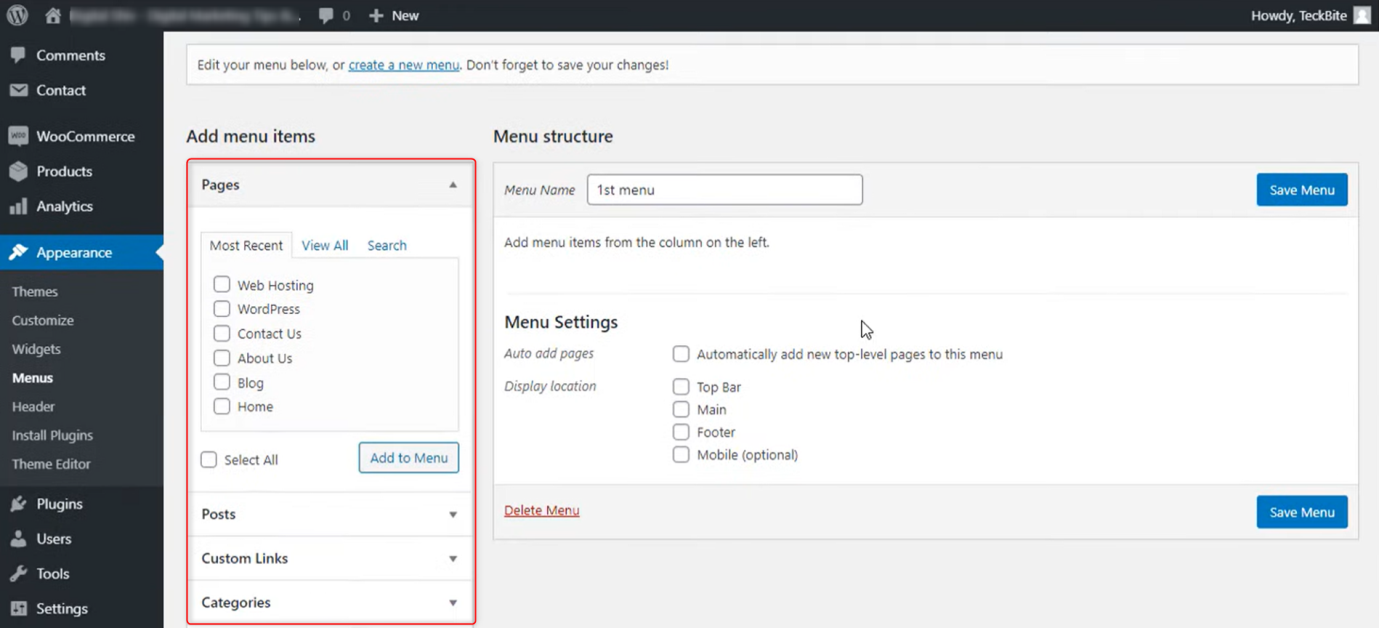
Once after successfully name your Menu, you’ll see a list of Pages, Posts, Custom Links, and Categories on the left of the screen (as given in the visuals above).
Every page, category, or particular post you have created recently will be shown in this section. Select any particular or all sections and hit the “Add to menu” button.
All selected items will be then featured in the main Menu, which will be visible on the site. You can even drag and drop menu items in the main menu section (on the right side) to create a sub-menus.
(Please note: you will be creating a menu for pages, a Menu for posts, and a Menu for categories separately.)
Once you have successfully done creating your Menu, it must look something like this.
(Please note: the location of the Menu where you want them to be visible on the site can be specified from the “theme customization”. Simply go to Appearance > Theme> Customize and then Menu. Select header menu, footer menu, and sidebars here.)
Once you have all those vital pages created. The theme is fully set, and navigation has been properly built.
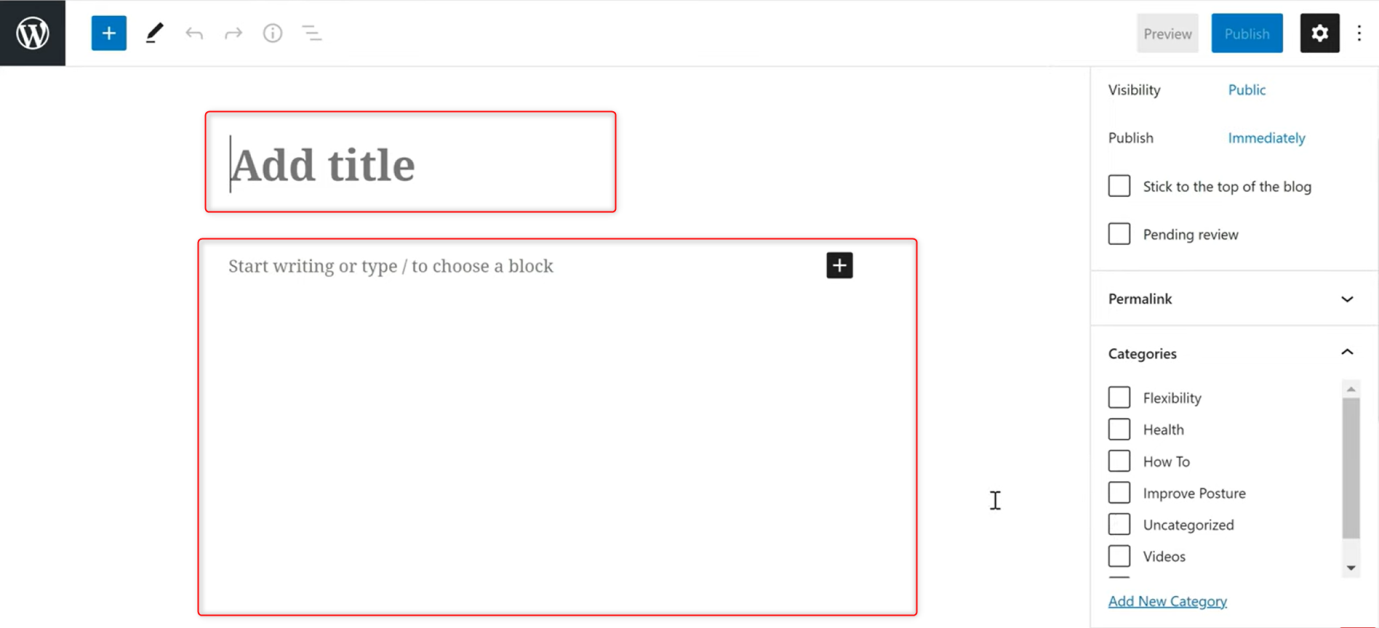
You can head to the “Blog Post” section and click on “Add New” to get your first blog post ready. Doing so, you will be sent to a page where the entire blog post will be created in real-time.
As you can see in the visual above. It is the main section where your blog posts will be created, published, and rated. Most SEO work will happen in this section.
Start by giving your blog post an attractive and SEO-friendly title. Simultaneously, create a summary or description around the blog title. For the best results, you can keep the length of your blog post at least 1000+.
On the right-hand side, you will notice “tags”, “thumbnail”, and “image section”. So have a look at this area because you will require them on the steps ahead.
All helpful WP plugins you have downloaded for the blog post will be featured in this area. Therefore, you are always advised to keep yourself familiar with this whole section.
(Please note: before writing a blog post, make sure you have downloaded SEO Plugins – Yoast SEO or RankMath. Using these tools, you can create an SEO-friendly blog post that ranks faster on the Internet.)
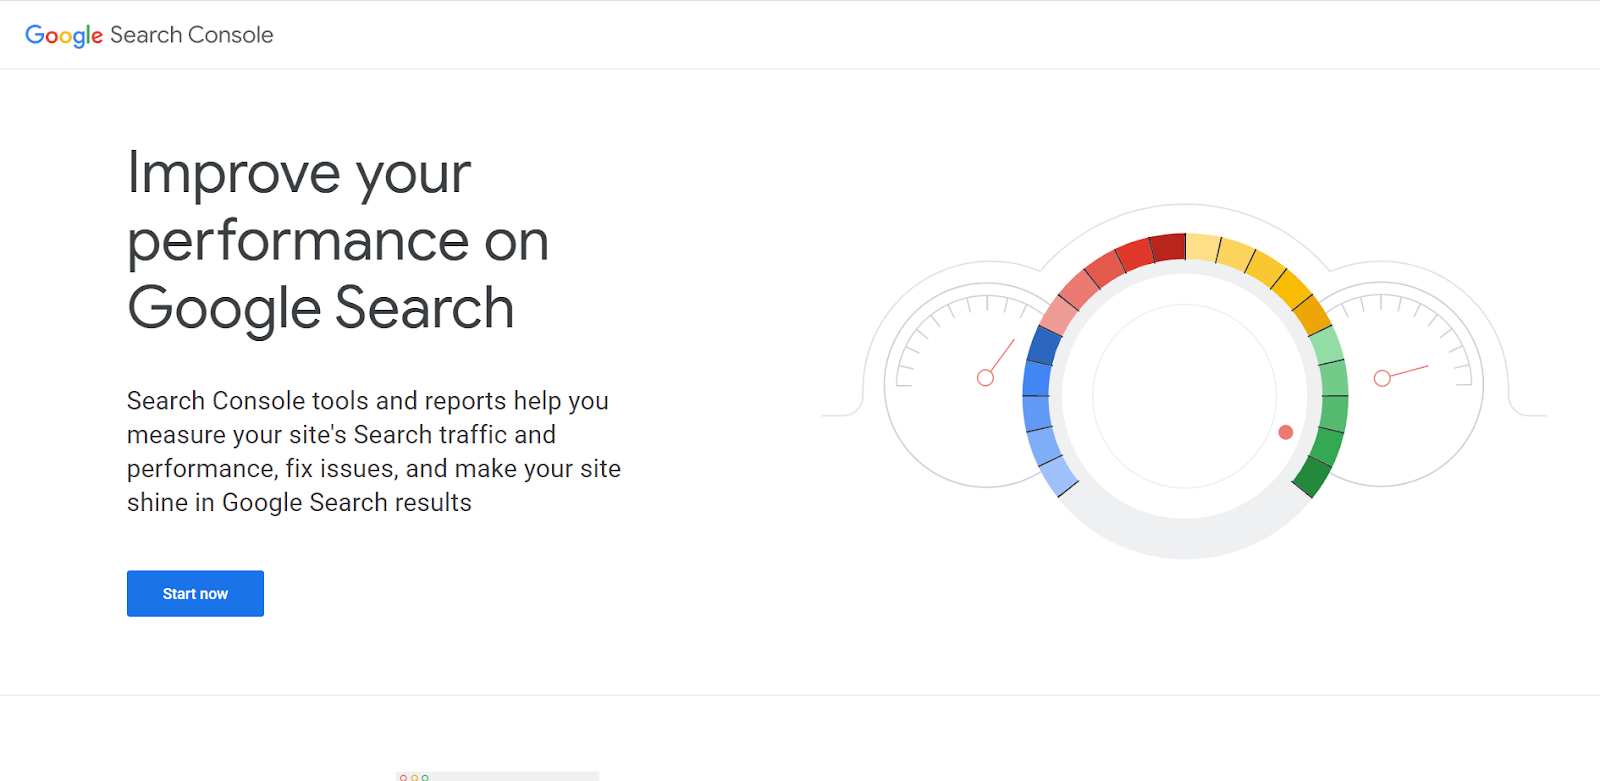
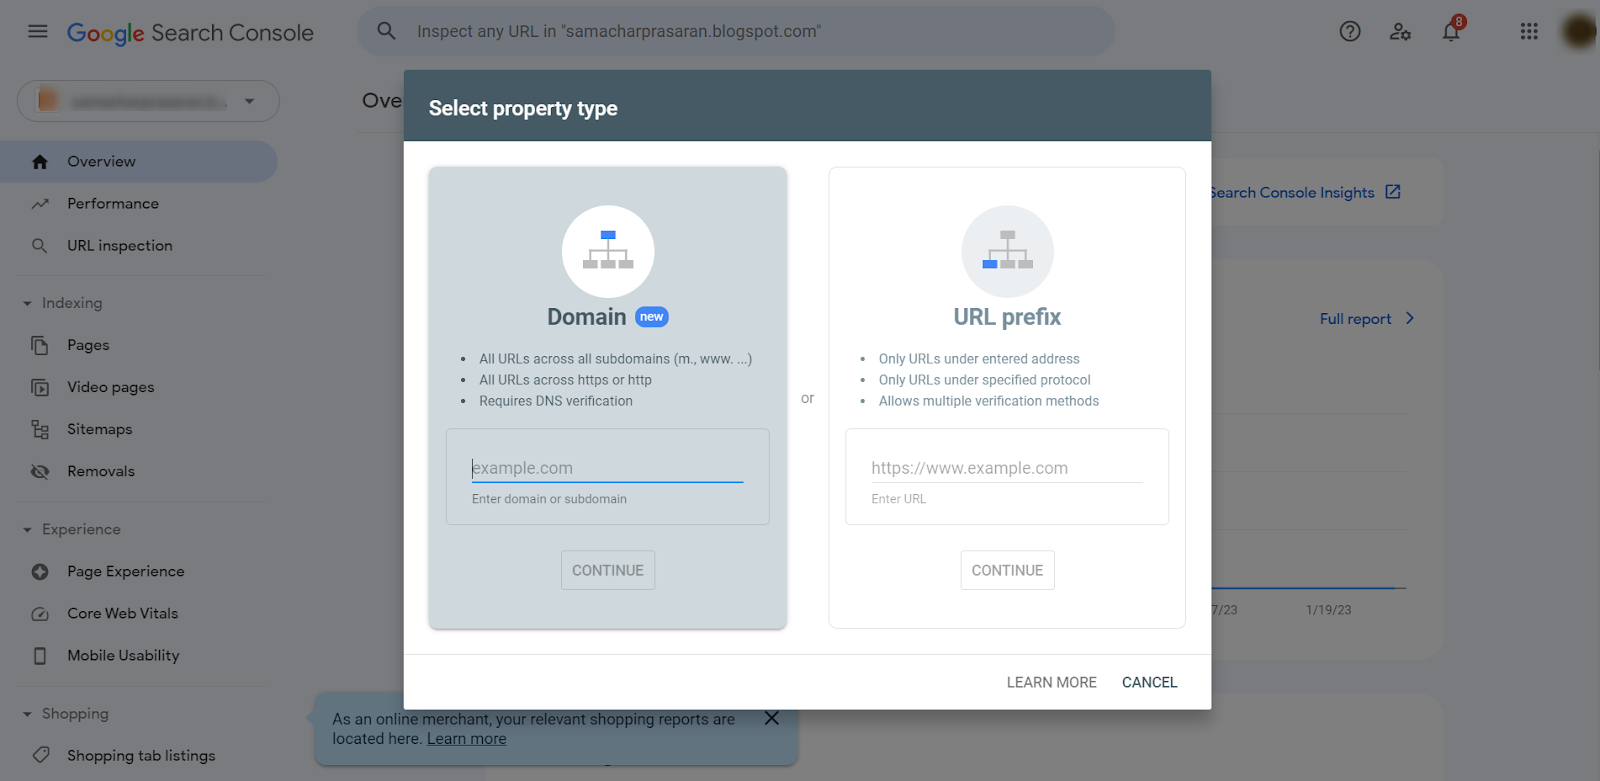
Unfortunately, your Blog is still invisible to your audience. So make it visible now.
To bring your Blog into searches, you need to submit your website in the “Google Search Console”. For this, you can follow some basic steps.

Blog topic matters a lot in deciding the overall progress on the Internet. But this turns out to be one of the most challenging parts of the journey because finding an ideal blog post topic is sometimes confusing.
So let’s give a short trick.
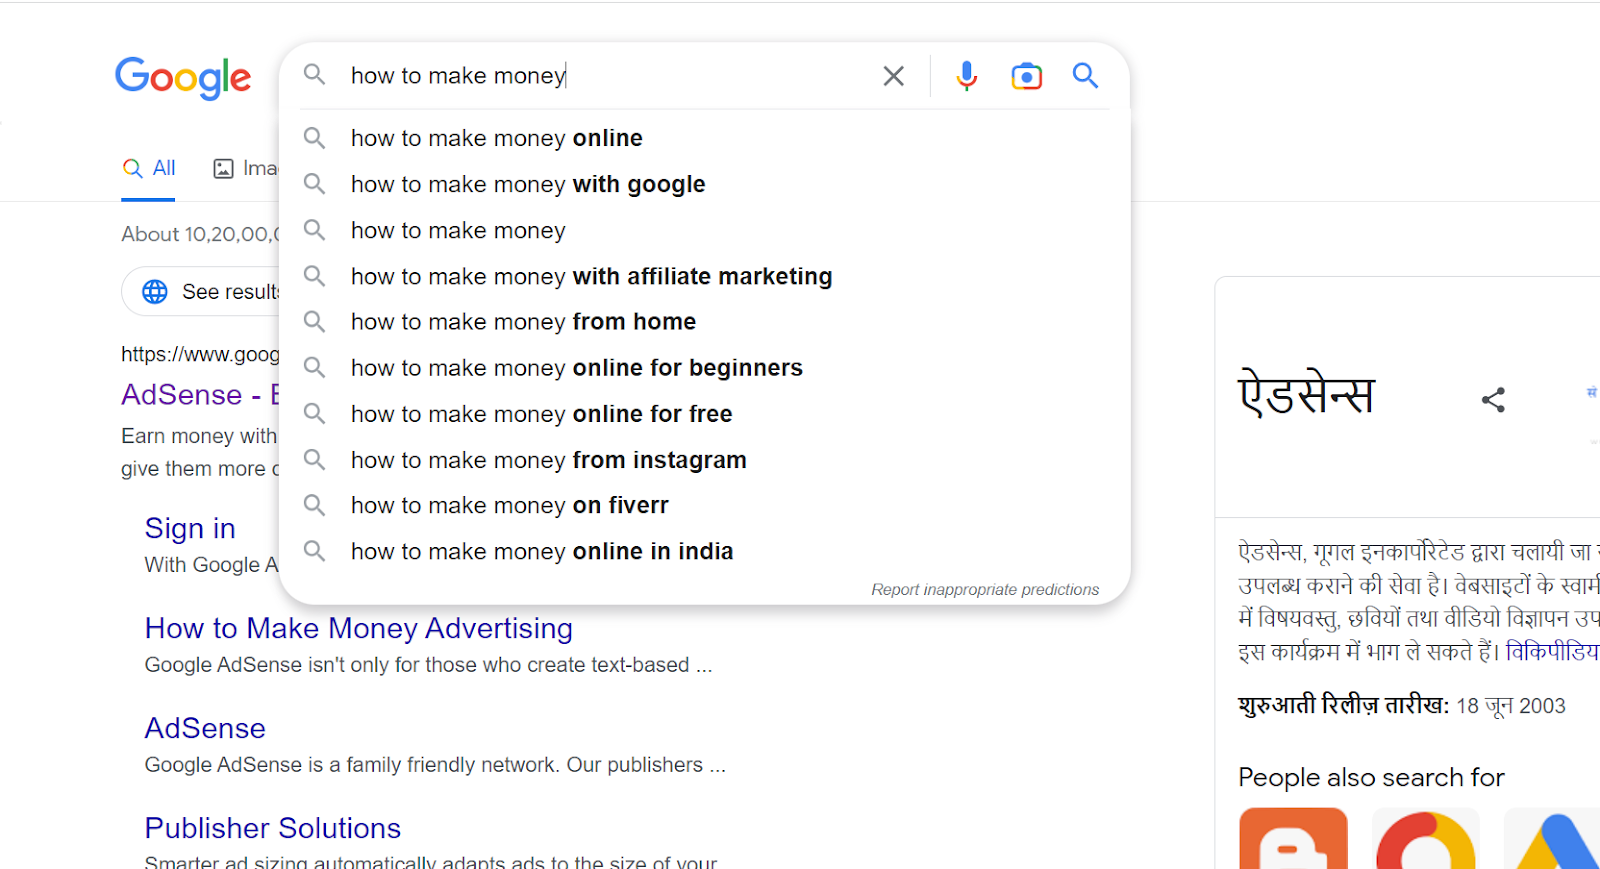
Simply go to the “Google Search Box” and type any best keyword or query and hit the “Search Button.
Again, Right Click on the “Search Box”, but this time, you will see a list of keywords and queries in the drop-down. All these queries on Google are basically queries that are frequently asked by the audience around the main topic. So use them as a blog topic on your website and see how your blog works for you.
Finally, your Blog is ready. It is just an initial process of finding a blog niche and establishing a blog on WordPress online. But for an advanced level of blogging, make sure you don’t forget to install some helpful add-ons or special WP plugins exclusively designed for your blog success.
Please choose a subject and stick to it. The more you’re consistent on a particular topic or niche, the higher your chances that your blog will succeed.
With that, you should even maintain consistency in your blog post publishing. It signals the search engine that your blog is building expertise, encouraging its crawl robot to push your website up on the top search results and make it visible to a larger audience online.
Blogging is about value creation, which is the key to converting a blog into a massive revenue-generating machine. The more value your topic has, the better results you will enjoy practically from blogging.
The best way to start a blog is to first select your niche. After that, start finding keywords with the most search volume, less competition, and great income potential (which means high CPC).
As soon as you determine these basics, scout for a domain that’s easy to remember (from a trusted domain broker). Then purchase hosting services and link your domain with the hosting server.
Usually, hosting service providers provide domains for free. So, in case you have that offer, grab it, and you don’t need to purchase a domain separately.
Similarly, you will install WordPress and a theme before creating key pages (for example, an “about us,” “privacy policy,” and “terms and conditions” page). Stay consistent on your blog post because, in the steps later, you will have to give maximum priority to this thing.
The best way to decide the niche for your blog is to first divide your preferences. Simply put, your blog’s niche can be decided based on the following parameters:
Interest-Based Niche: You can work on any blogging niche you are interested in. Indeed, it is the best way to start a blog because the more you are interested in a niche, the better you will be able to create valuable content around it.
Blog Niche with High Search Volume: Some niches are more popular than others and are called macro niches (e.g., insurance). These niches attract the highest traffic online compared to the rest. But they can be super competitive, offering less CPC.
Blog Niche with Low Competition –
Most small bloggers target less competitive niches because they are easy to scale. These niches also refer to as micro niches (e.g., insurance for the bike).
High-CPC Blog Niche: Some blog niches have higher return potential but can be extremely competitive. These niches offer a higher CPC than the rest, so choose wisely.
Building a money-making blog isn’t rocket science. Think practically from the beginning. If you want to make money from your blog through “Google AdSense,” comply with the terms from the start. Attract organic traffic to your website and stay away from quick techniques.
Maintain brand consistency and a professional tone in your working flow from start to finish. If your blog attracts income through sponsors and advertisers, then create sponsor-friendly content. Creating connections on the internet is also the best way to make your blog a big success.
Your blog can also earn money through affiliate income. But make sure none of your affiliate products is too unique for your audience. Simply put, if your blog is in the “fashion niche,” you will hardly attract any sales and conversions for “web hosting affiliates” because the audience is different.
If your blog is centered around just a single niche or term, you can choose your domain name around a specific keyword, such as “makemoneyonline.com,” if the keywords you are supposed to be using in your blog posts carry this main keyword.
Alternatively, you can choose a short or crisp name for your blog. But consider noting that it should have a meaning and must define your niche. These are some useful things you can try:
Gather related keywords.
Incorporate another language.
Experiment with words and keywords.
Use thesaurus, dictionaries, and synonyms.
If a domain name is taken, there’s no way to purchase it until it is listed as “for sale” by its owner. If you like a domain name, simply Google it.
If the website is live, locate their contact details and express your interest in their domain. Please note: they can sell a domain at any price.
Especially if their domain has high authority and a strong backlink profile, the price could be highly high. Alternatively, you can contact the domain registrar and tell them that you want the domain that isn’t available. They might help you get this domain from its original owner by working as a mediocre.
The best place to create a blog is on WordPress. The world’s famous CMS platform is widely known for its smooth features and purpose-driven functions. WordPress serves flexibility in operation handling. You can customize the menu, theme, and layout per your needs.
Not only this, but you can even effectively tackle challenges related to SEO or anything else that could directly impact your blog and its ranking in the search results. Many blog activities can be handled by automation.
The cost and overall investment in a blog can vary significantly. If you write yourself for the blog, you only need to worry about domain and hosting charges.
There are no other expenses. But if you hire a writer or a team of writers or developers to handle the technical aspects of your blog, the cost will rise gradually. Since you will require a daily or weekly blog post for your blog, the expense can be recurring. So keep this thing in mind.
The major income sources a blogger makes money through are as follows –
Google AdSense
Sponsors
Guest Posts
Affiliate products
Backlinks
Subscription
Digital product offerings
Not having patience and staying inconsistent on the blog is the major reason behind the failure of most blogs. Right, from day one, you should be determined not to do daily but at least monthly; you will be publishing a blog.
Another notable reason largely blamed for blog failures is not understanding the audience. If your blog isn’t serving value, not bringing desired information, or not satisfying visitors to the site, it will generate no outcomes.
I'm Ravi Gupta, the founder of ravi-gupta.com. Here, I teach beginners to Get More Traffic More Customers More Revenue With Digital Marketing Join Our Newsletter
How To Make Money Blogging (Your Passive Income Guide for 2024)
Published on 31 December, 2023

Keyword Research for SEO – The Ultimate Guide For Beginners (2024)
Published on 31 December, 2023
Best WordPress Themes for Affiliate Marketing 2024
Published on 13 December, 2023
5 Best WordPress Hosting in Australia 2024
Published on 13 December, 2023
Get FREE access to our Book - 299+ Way make money online without investment
Get The BookJun 6, 2019 at 9:48 pm
I have installed and activated the plug-in, put it in the side bar and logged in to FB (choosing my nominated page) however none of the Review & Slider Options came up, only the Facebook details, Title, Pagination, Characters before ‘ read more’ link, Widget Width etc.
ReplyThanks for choosing to leave a comment. Please keep in mind that all comments are moderated according to our comment policy, and your email address will NOT be published. Please Do NOT use keywords in the name field. Let's have a personal and meaningful conversation.
Save my name, email, and website in this browser for the next time I comment. Notify me of followup comments via e-mail. You can also subscribe without commenting. Submit CommentJun 6, 2019 at 9:48 pm
I have installed and activated the plug-in, put it in the side bar and logged in to FB (choosing my nominated page) however none of the Review & Slider Options came up, only the Facebook details, Title, Pagination, Characters before ‘ read more’ link, Widget Width etc.
ReplyThanks for choosing to leave a comment. Please keep in mind that all comments are moderated according to our comment policy, and your email address will NOT be published. Please Do NOT use keywords in the name field. Let's have a personal and meaningful conversation.
Save my name, email, and website in this browser for the next time I comment. Notify me of followup comments via e-mail. You can also subscribe without commenting. Submit CommentMay 21, 2018 at 7:53 am
Today I learned new technic from this Blog. Thanks.
ReplyThanks for choosing to leave a comment. Please keep in mind that all comments are moderated according to our comment policy, and your email address will NOT be published. Please Do NOT use keywords in the name field. Let's have a personal and meaningful conversation.
Save my name, email, and website in this browser for the next time I comment. Notify me of followup comments via e-mail. You can also subscribe without commenting. Submit CommentThanks for choosing to leave a comment. Please keep in mind that all comments are moderated according to our comment policy, and your email address will NOT be published. Please Do NOT use keywords in the name field. Let's have a personal and meaningful conversation.
Save my name, email, and website in this browser for the next time I comment. Notify me of followup comments via e-mail. You can also subscribe without commenting. Submit CommentI'm Ravi Gupta, the founder of ravi-gupta.com. Here, I teach beginners Get More Traffic More Customers More Revenue With Digital Marketing Join Our Newsletter
Information
Navigate
Resources
© 2018-2024 Ravi-Gupta.com - All rights reserved